
雙線性插值(Bilinear interpolation)的圖像拉伸在mobile上面的實現
雙線性插值簡單的說,就是擴展了之後的圖像像素坐標映射回原來的坐標空間的時候, 如果出現了沒有對應到整數點的情況。這時候需要做2次線性的插值計算出新的坐標的像素值,比如說:
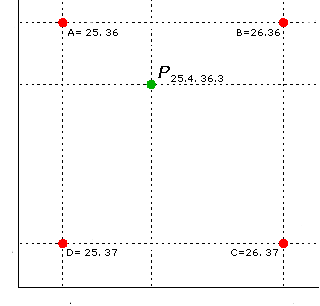
這裡可以看到這個P點落在了ABCD區間內, 如果我們本著最朴素的這個P點最靠近誰權重就越大的加權平均的思想, 我們很容易得到這樣的論斷:
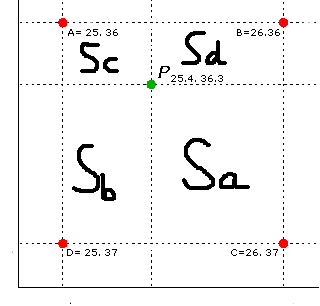
A點對P的影響就是Sa的面積, B點的影響就是Sb, C點就Sc, d就是Sd。這樣越近就是權重越大,基本上就是這樣的邏輯。
這樣P的像素可以簡單的用 (A*Sa+B*Sb+C*Sc+D*Sd )/(Sa+Sb+Sc+Sd);來得到了。如下的代碼:
view plaincopy to clipboardprint?
/**
** method to remove sharp the raw image with unsharp mask
* @param src input grayscale binary array
* @param dst output grayscale result, the memory need to be allocated outside of the function
* @param srcWidth width of the input grayscale image
* @param srcHeight height of the input grayscale image
* @param scalePercent, scale percentage (0-xxx)
*/
void stretchImage (const unsigned char* src, unsigned char* dst, int srcWidth, int srcHeight, int scalePercent)
{
if (scalePercent < 0)
return;
int x, y;
int ox, oy;
int tmpx,tmpy;
int ratio = (100 << 8)/scalePercent;
int dstWidth = srcWidth * scalePercent / 100;
int dstHeight = srcHeight * scalePercent / 100;
unsigned char color[2][2];
for (int j = 0; j < dstHeight; j ++)
{
for (int i = 0; i < dstWidth; i ++)
{
tmpx = i * ratio;
tmpy = j * ratio;
ox = tmpx >> 8;
oy = tmpy >> 8;
x = tmpx & 0xFF;
y = tmpy & 0xFF;
color[0][0] = src[ oy*srcWidth + ox ];
color[1][0] = src[ oy*srcWidth + ox +1 ];
color[0][1] = src[ (oy+1)*srcWidth + ox ];
color[1][1] = src[ (oy+1)*srcWidth + ox+1 ];
int final = (0x100 - x)*(0x100 - y)*color[0][0] + x*(0x100 - y)*color[1][0] + (0x100-x)*y*color[0][1] + x*y*color[1][1];
final = final >> 16;
if (final>255)
final = 255;
if (final<0)
final = 0;
dst [ j*dstWidth + i] = (unsigned char)final;
}
}
}
需要說明的事情是, 浮點數需要引入效率上一定的損失, 當然我們這裡就用大數來和諧。但是只是隨便寫寫的代碼, 我們沒有加入超出int范圍的檢查或者說明,暫時也只能這樣了:)。用了這個函數的效果還是不錯的, 我們來看看在75%,125%和250%時候的效果:
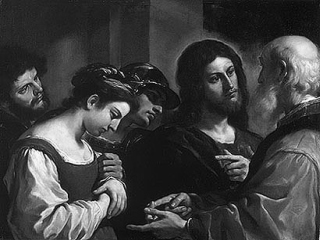
原圖:
%75效果圖:

125%效果圖:

250%效果圖:

其實從效果圖多少可以看出一些的問題就是, 隨著圖像的拉伸, 圖像的銳度其實降低了, 這個比較容易想象的,因為我們這個拉伸的辦法本身就是線性的,無疑來擴大的時候把銳利的邊緣模糊化了,所以自然在圖像擴大很多倍的時候效果不是很好了。
本文來自CSDN博客,轉載請標明出處:http://blog.csdn.net/hhygcy/archive/2009/08/11/4434870.aspx
沒有留言:
張貼留言